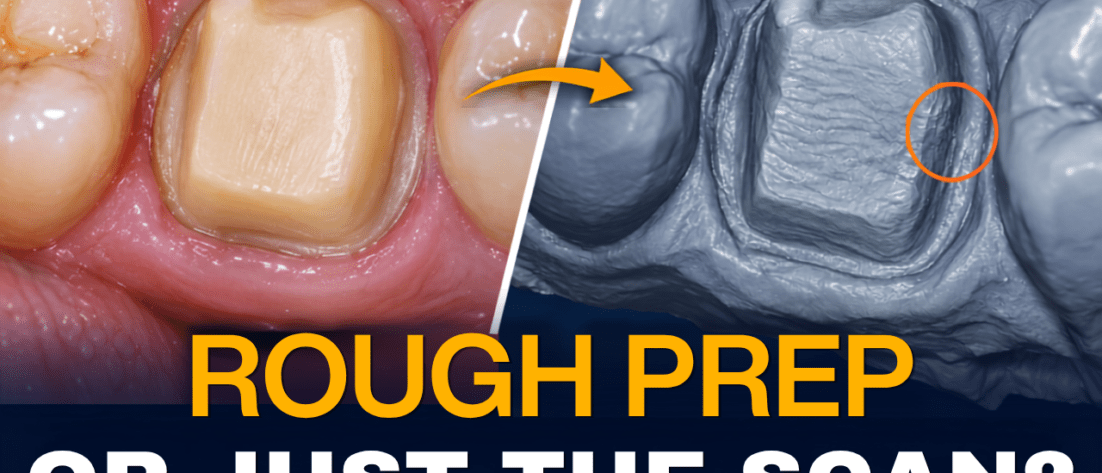
You finish your crown prep and have a good look (ok, good enough!😅). The walls seem smooth, the margins look clean, and everything appears ready to scan.
Then the scan appears on screen…

Suddenly, there are grooves everywhere!
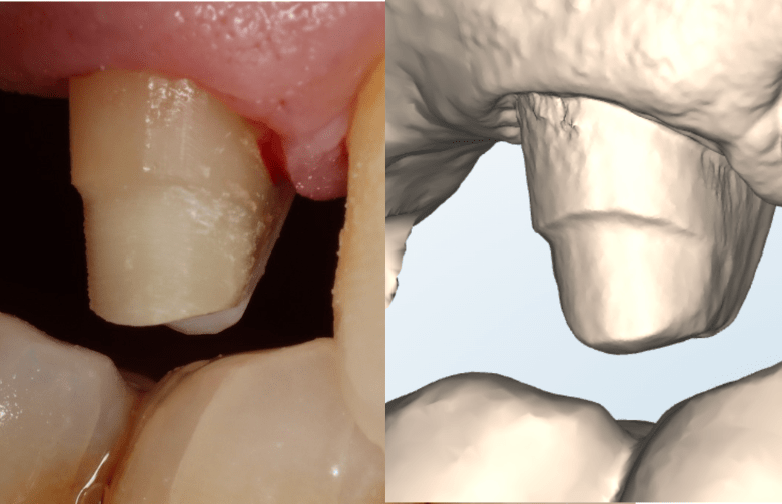
The axial walls look slightly wavy, and the margin that seemed perfectly acceptable clinically looks much less tidy when magnified and rotated 😅
Sound familiar?
So, why can a crown prep look smooth clinically but irregular on an intraoral scan? And more importantly, WHEN does that irregularity actually matter?
Magnification can make minor bur marks and surface texture look much more significant on an intra-oral scan. What matters is whether the irregularity affects the finish line, reduction, path of insertion or the ability to design and seat the restoration accurately.
Why Does My Crown Prep Look Rough on the Scan?
One of the biggest reasons is simply magnification.
In the mouth, you’re assessing the preparation within a relatively small working area and from limited viewing angles. On screen, you can enlarge it SIGNIFICANTLY and rotate it in almost any direction.
Small grooves left by a diamond bur suddenly look deeper. Slight changes in axial contour become more obvious. Minor irregularities along the finish line that were difficult to appreciate clinically are now right in front of you.
The scanner hasn’t necessarily made your prep look worse. It may simply be showing you more.
Does a Rough-Looking Scan Mean It’s a Bad Prep?

Not necessarily. A crown prep doesn’t need to look like a perfectly smooth, computer-generated tooth when viewed at high magnification. Some surface texture is inevitable.
Interestingly, a ‘rough’ prep may aid us for cemented restorations, but for adhesive restorations we want a smoother surface to bond to.
The more useful question is: Could this irregularity affect the final restoration?
Instead of focusing on every visible bur mark, look for features that could affect the restoration:
- Finish-line continuity and visibility
- Sharp edges(!) or abrupt transitions
- Lips and ledges
- Undercuts
- Uneven reduction
- Areas where the margin becomes difficult to identify (this is a HUGE one for labs, isn’t that right Graham?)
A few visible bur marks may not be a problem. A poorly defined or irregular finish line deserves more attention. Ultimately, the preparation has to support a restoration that fits and functions predictably.
For more on assessing the final result, check out our episode on crown fit and evaluating indirect restorations.
1. Your Bur Leaves a Surface Signature
Every bur leaves some degree of surface texture. Coarse diamonds are great for efficient tooth reduction, but they also leave grooves behind. These might be barely noticeable clinically, yet look surprisingly prominent once the prep is enlarged on screen.
A simple sequence can help: Reduce → Refine → Finish.
Use the appropriate bur for gross reduction (green or blue grit diamonds), then move to a finer-grit instrument/bur (red and yellow grit) when refining the preparation and finish line. The aim isn’t to polish the tooth until it looks glass-smooth. It’s to remove significant grooves and create smoother, more continuous transitions.
2. Repeated Bur Passes Can Create Wavy Walls
We’ve all done it: reduce, check, spot one area, go back with the bur, check again, then notice something else…
Each correction seems minor, but multiple overlapping passes can gradually create changes in contour. The wall may look reasonably smooth clinically but appear wavy or faceted on the digital model.

BIGGEST TIP: During initial refinement, use deliberate, continuous passes that follow the intended contour rather than repeatedly correcting isolated areas.
3. Watch Your Bur Angulation

It’s not only the grit of the bur that matters. Bur angulation matters too.
Small changes in angulation during preparation can create facets, grooves and abrupt transitions. These become especially easy to spot when the digital model is rotated.
When refining, think about the entire long axis of the bur rather than focusing only on its tip. And don’t judge the preparation from one direction. A prep can look great from the occlusal view but reveal an irregularity from the buccal, lingual or proximal aspect.
4. Pay More Attention to the Margin!
The axial walls don’t need to look perfectly polished on screen. The finish line, however, deserves a closer look.
Ask yourself: Can I follow the margin continuously around the entire preparation?

Look for areas where it becomes wavy, indistinct, lipped, stepped or difficult to separate from the axial surface. A prep can have some visible surface texture and still be perfectly usable. A poorly defined margin creates a different problem because the restoration still needs a clear boundary to be designed accurately.
And remember, the scan isn’t only for you—the technician needs to be able to interpret it too. For a technician’s perspective on what makes a useful digital impression, listen to our Q&A on impressions, scans and crown work.
CLINICAL PEARL: Don’t judge the prep by how smooth it looks. Judge whether the technician—or software—can clearly identify where the preparation ends.
5. Could It Be the Scan Rather Than the Prep?
Before reaching for the bur again, remember that not every strange-looking area on the digital model is necessarily a preparation defect.
Blood, saliva, inadequate tissue displacement and limited access can all affect how well the scanner captures the preparation—particularly around equigingival or subgingival margins.
Sometimes just some additional PTFE/cord retraction fixes this up right away.
Remember, for SCANS we need to be more AGGRESSIVE with retraction, compared to impressions.
Digital impressions can place greater demands on tissue management, particularly when you’re trying to capture a clear finish line. We discuss this—and the wider relationship between crown preparation, ceramics and scanning—in our episode on dental ceramics and digital impressions.
Before touching the bur again, decide what you’re looking at:
PREP PROBLEM — a genuine ledge, undercut, irregular margin or inadequate reduction
SCAN PROBLEM — incomplete or distorted data caused by moisture, tissue, access or inadequate capture
6. Use Your Intraoral Scanner as an Evaluation Tool

One of the most useful things about digital impressions is that the scanner can become an evaluation tool, not just an impression tool.
Once you’ve scanned, rotate the preparation and look specifically for significant grooves, sharp transitions, irregular margins, undercuts and areas of inadequate reduction. If you spot a genuine problem, refine that specific area and rescan.
Clinical pearl: The key is targeted refinement. Don’t automatically reach for the bur every time something looks slightly rough at high magnification. Chasing a perfectly smooth digital prep can mean removing tooth structure that didn’t need to be removed.
A Simple Prep-to-Scan Workflow
Reduce → Refine → Finish → Isolate/Retraction → Scan → Rotate → Inspect → Target Refinement → Rescan if needed
Once the preparation is scanned, use the digital model to take one final look from multiple directions. Correct the irregularities that could genuinely affect the restoration rather than every visible bur mark.
Don’t Chase Digital Perfection!
So, the next time your clinically smooth crown prep suddenly looks rough on the scan, ask: Is this a preparation problem, a scanning problem, or simply the scanner showing me something I couldn’t see clinically?
That distinction can tell you whether it’s time to refine and rescan—or confidently put the bur down.
Stop being so harsh on yourselves and know WHEN it’s worth rescanning, Protruserati!
Kate and Jaz
Continuing Education Information
This activity may be eligible for continuing education credit through Protrusive Guidance. Participants must complete the associated quiz inside Protrusive Guidance to obtain a CPD/CE certificate.
Cost:
Access to this CE activity is included with an active Protrusive Guidance membership. Current membership pricing is available at www.protrusive.app.
Cancellation & Refund Policy:
Memberships may be cancelled at any time. Access to CE activities remains active until the end of the current billing cycle. Subscription charges are non-refundable once processed. Full details are available at www.protrusive.app.
Delivery: Self-instruction (online) · Location: Online
Contact: manager@protrusive.co.uk