Welcome to the first of a series of blog articles to Make Dentistry Tangible 😊
Let’s shine the light on PRE-WEDGING!
You finished a Class II composite.
The anatomy looks good, the marginal ridge is where you want it, and then you reach for the floss. It slides straight through 😭
We’ve all been there!
Class II’s can actually be really tough to nail consistently – but you all knew that already.
Getting a predictable proximal contact can be one of the frustrating parts of Class II composites.
And while the matrix and separation ring usually get most of the attention, there’s another step worth thinking about before you even pick up the bur: pre-wedging.
What Is Pre-Wedging?

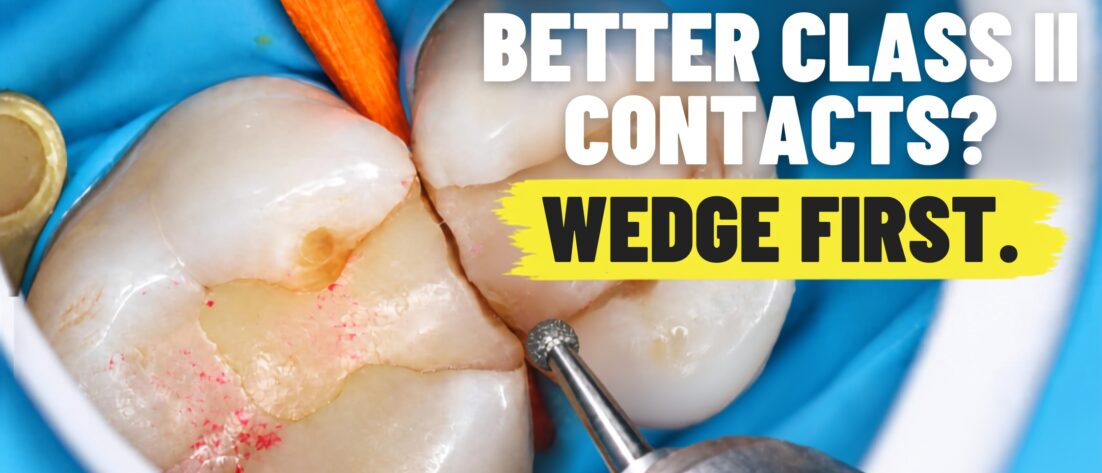
Pre-wedging is exactly what it sounds like: placing the wedge before you prepare the proximal box, rather than waiting until the sectional matrix is in place (or in my hands, the greater curve matrix in 70% cases nowadays).
That small change in sequence creates slight temporary separation between the teeth. It also gives you a physical barrier between the bur and the adjacent tooth while you break the proximal contact.
ALSO it compresses the papilla, making accessing equi-gingival and subgingival caries easier.
Once the preparation is complete, the wedge can be removed or adjusted as needed before the sectional matrix is placed in Kate’s case.
For Jaz, when using the Greater Curve, he has moved to a ‘wedgeless’ protocol‘.
Pre-wedging is a simple step, but it can make several parts of the Class II restoration easier.

How Does Pre-Wedging Improve Class II Contacts?
1. It Starts the Separation Early

Even a very thin sectional matrix takes up space between the teeth. If that thickness isn’t adequately compensated for, the result may be a weak—or completely open—proximal contact.
Pre-wedging starts the separation before the matrix goes in. After the restoration is complete and the wedge, matrix and separation ring are removed, the teeth rebound towards their original positions. That rebound helps create the pressure needed for a firm contact.
2. It Can Make Matrix Placement Easier

Trying to slide a sectional matrix through a very tight contact can crease or distort it before you’ve even started restoring. A little initial separation can make insertion easier and help preserve the shape of the matrix.
Of course, the matrix itself matters too. If you’re unsure which system to reach for, check out our guide to choosing the best matrix system for Class II restorations.
CLINICAL PEARL: A tight contact in the wrong place is still a poorly contoured restoration.
3. It Helps Protect the Adjacent Tooth

The wedge isn’t only there for separation. During proximal box preparation, it can also act as a physical barrier between the bur and the neighbouring tooth. That extra bit of protection can make breaking the contact feel more controlled and reduce the chance of an iatrogenic nick.
Jaz quite likes the ‘wedge-guards’ with the metal shields.

Pre-wedging isn’t the only way to approach a Class II. For an alternative workflow—including the contact opening technique—listen to our episode on Class II composites without a wedge.
Do You Still Need a Separation Ring?
When using sectional systems like Garrison or Palodent or even Bioclear, usually, yes. Pre-wedging doesn’t necessarily replace the separation ring—the components of a sectional matrix system have different jobs and work together.
The pre-wedge starts the separation before preparation and matrix placement. The wedge also helps with cervical adaptation of the matrix, while the ring provides additional separation and helps stabilise the matrix against the tooth.
Think of pre-wedging as one part of the whole matrix protocol, rather than a standalone trick for making contacts tighter.
For more tips on wedges, matrices, separation and managing back-to-back Class IIs, check out our sectional matrix troubleshooting for Class II composites episode with Dr Chris O’Connor.
Can You Create a Contact That Is Too Tight?
Absolutely. More separation isn’t always better!
If you pre-wedge aggressively and then add further separation with the wedge and ring, you can go too far. Once the teeth rebound, the patient may be left with a contact they can barely floss.
They may describe pressure between the teeth, tenderness when chewing or difficulty getting floss through. This can sometimes be labelled as post-operative sensitivity, although the discomfort may actually be periodontal or interproximal rather than pulpal.
The aim is controlled separation—not maximum separation. Choose a wedge that provides adequate separation and cervical adaptation without forcing the largest wedge possible into the embrasure.

Before the patient leaves, check the contact. Floss should pass through with resistance and a distinct snap, but it shouldn’t require excessive force. If the floss won’t pass, assess and correct the contact rather than calling it a win 😉.
A Simple Pre-Wedging Workflow (Sectional Systems)
A practical sequence might look like this:
1. Assess the existing contact and embrasure before starting the preparation.
2. Select and insert an appropriately sized wedge to create controlled separation.
3. Prepare the proximal box with the adjacent tooth protected by the wedge.
4. Remove or reposition the wedge as necessary and insert the sectional matrix.
5. Re-establish wedging to achieve good cervical matrix adaptation.
6. Place the separation ring and check the stability and contour of the matrix.
7. Restore the Class II cavity.
8. Remove the matrix system and check the contact with floss.
9. Feel like a boss, get back in the car and listen to more Protrusive 🤘🏼
Better Contacts, Not Just Tighter Contacts
Pre-wedging is a small change in sequence, but it addresses several familiar Class II headaches.
The goal isn’t to create the tightest contact possible. Pre-wedging works best as part of a controlled approach that also considers matrix selection and positioning, cervical adaptation, separation and the final contour.
CLINICAL PEARL: Don’t chase the tightest contact possible. Aim for a firm, well-contoured contact that the patient can actually clean. Ultimately, the best Class II contact is firm, well-contoured and cleansable—not just tight.
We know that opinions are split on pre-wedging – what’s most important is what works in YOUR hands! If you do not pre-wedge and are getting good contacts, then carry on!
If not…give it a try!
Continuing Education Information
This activity may be eligible for continuing education credit through Protrusive Guidance. Participants must complete the associated quiz inside Protrusive Guidance to obtain a CPD/CE certificate.
Cost:
Access to this CE activity is included with an active Protrusive Guidance membership. Current membership pricing is available at www.protrusive.app.
Cancellation & Refund Policy:
Memberships may be cancelled at any time. Access to CE activities remains active until the end of the current billing cycle. Subscription charges are non-refundable once processed. Full details are available at www.protrusive.app.
Delivery: Self-instruction (online) · Location: Online
Contact: manager@protrusive.co.uk